Well friends, I have a new obsession. I am completely obsessed with this really awesome permaculture way of gardening. As an added bonus, it’s the most fun word to say! Especially if you attempt a German accent.
So what is my new obsession? Well, you found this post so you already know. Today we’re going to talk about HUGELKULTUR! Now say that fast three times.
What is Hugelkultur?
Hugelkultur (hoogle-culture) is simple, making a raised bed out of rotted wood. It encompasses permaculture by using organic material that will continue to feed back to the soil and create more and more growth over time. I found a great article that covers Hugelkultur in detail, which you can read here.
Benefits of Hugelkultur
There are SO many benefits of growing food in hugelkultur beds. Just like with all methods of permaculture, hugelkultur leads to a natural cycling of nutrients that feeds plants more and more with each passing year, without having to continually add to the soil. Some of the key benefits of Hugelkulture are:
Increased growing space
When you make a traditional hugelkultur bed, you not only can plant on the top, but all along the sides. It makes for a lot more room to grow food than an in-ground bed, or a raised bed with wooden sides. It’s also excellent for vining things, as they trail down the sides.

Decreased need to water
The rotted wood acts like a sponge, the top mulch layer eliminates evaporation, and the result is little to no need for watering!
Recycle organic materials from your yard
You can use trees that have fallen, branches and sticks that are lying around your property, your own sod, wasted or rotted hay, leaf mulch, organic compost, there are so many options here, and the best part? They can all be free, from your own backyard.
Low annual input
Making a Hugelkultur bed is a LOT of work! My body certainly got a workout, BUT, each year it will be almost no work at all to maintain. As the wood continues to break down, it will supply more and more nutrients, and very little annual input. No need to till, very little need to weed, which makes for a happy gardener.
The benefits of a raised bed
With Hugelkultur you get the other benefits of a raised bed, like heating up faster than an in-ground bed, decreased need to weed, and easier on the body and back when planting! Hugelkultur is all of that, and more!
Building a Hugelkultur Bed
Below are the steps that we took for building our bed. There are many ways to design a Hugelkultur bed, and for us the most important part was utilizing the organic matter that we already had. Consider what you have on your property and how you can use it to layer organic matter and create an epic Hugelkultur bed. Think about the bed as layers of organic material on top of rotting wood.
*optional but beneficial steps

Step 1: Digging up the sod*
This was not fun work, BUT it was a critical step for preparing the bed and getting ready to plant in the first year. I’ll tell you more about that in step 5.
Step 2: Adding large logs that are decaying
(2-3 years after fallen or cut down is preferred, but not required)
Step 3: Fill in the air gaps with composted wood chips*
I chose to add in this step because I think it will add essential nutrients more quickly than the large logs might, in addition it will more readily absorb moisture as the other logs, branches, and large chunks of wood slowly begin to do the same.
Step 4: Add lighter wooden materials, smaller rotting logs, branches, etc.
This step was helpful because it utilized branches from trees we had cut down, and it helped form the structure of the bed.
Because I decided to lay down the sod on top of the branches, I didn’t have to worry to much about all of the air space that the branches created. The heavy sod quickly shrunk it all down, as you can see in the YouTube video above.
Step 5: Add other nitrogen rich matter
This is where we added back the sod to the bed. I laid it upside down so that the grass didn’t grow right through the rest of the materials. This is going to be so helpful for year 1 because it gives a nice layer of nitrogen rich matter (from the grass and roots), and it gives 3-4 inches of high quality top soil for the plants to send their roots into.
As mentioned above, the weight of the sod also helped us decrease large air gaps and bring everything closer together, to expedite the decaying process.
After laying down the sod, we laid down a couple inches of rotting hay. This was the easiest step by far as we had a round bale that we were able to roll out on top of the bed.
Step 6: Add top soil & rich compost
This is a really important step for year 1 planting. The thicker the layer, the more versatility you will have for what you can plant in your bed. We put a thicker layer on the top of the hugelkultur bed, with a thinner layer on the sides. This was helpful when we went to plant, which I discuss in detail below.
For our topsoil/compost layer, we used organic mushroom compost and organic topsoil and added both to the top of the bed with about 2-3 inches. This was the only material that we had delivered, in the future we will use our own compost to add to the different garden beds, but we aren’t at that point quite yet!
You could also dig out more soil in step 1, after removing the sod, and use your own soil to top off the bed, adding in compost as well.
Step 7: Plant! (see below for more information)
Step 8: Mulch with organic material
This step we haven’t gotten to yet, I plan to do it today once I finish planting everything. Mulching is important in the garden because it protects the soil, improving the soil health, retains moisture and prevents evaporation, and adds additional organic material to the bed.
You can mulch with leaves, grass clippings, straw, rotting hay, composting wood chips. So many options with materials you may already have in your backyard!
Planting a Hugelkultur Bed in Year 1
The key for us was planting things with shallow root systems, to avoid nitrogen depletion that can be caused by the wood before it starts to rot, and because our layer of top soil was not very thick.
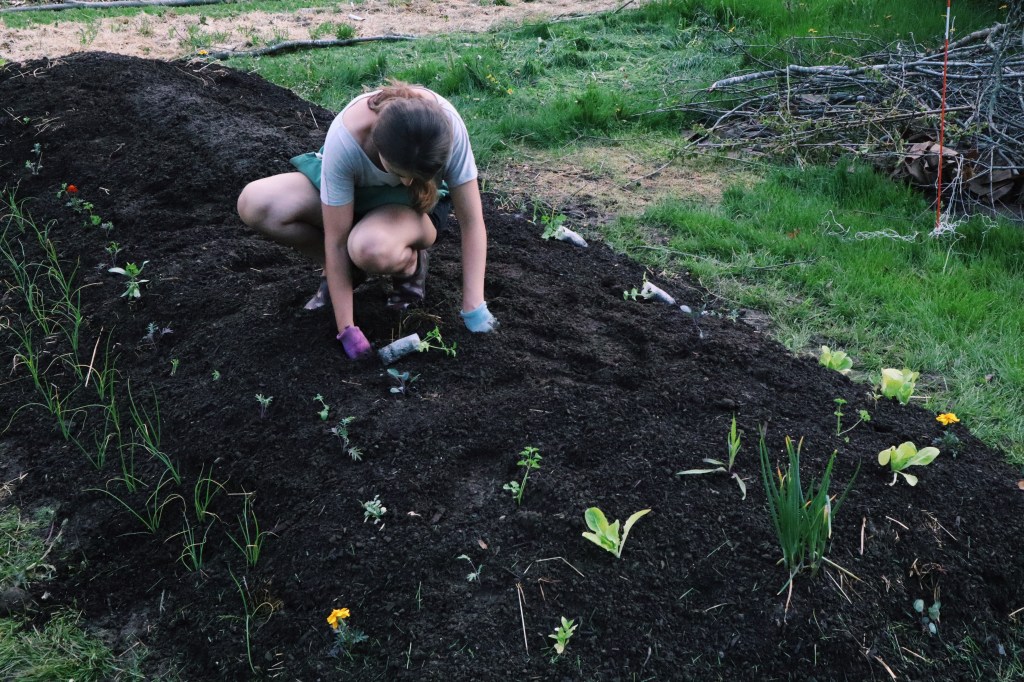
So what did we plant?
- Onions around the perimeter
- Annual flowers, greens, and kale on the sides
- Some peanuts on the top to experiment
- A few celery plants
- A couple of cabbage plants
- Egyptian walking onions
- Summer squash and cucumbers on the top*
*For the squash I added another few inches of soil mounded on top to give the roots extra room to grow and expand.
I will continue to share the progress of our Hugelkultur bed throughout the season, as well as over the years! We plan to continue adding Hugelkultur beds, some big and some small, throughout our garden, and I can’t wait to watch this method improve with time.
That’s all for now friends.
All my best,
Jenn

One thought on “Step by Step Guide for Building a Hugelkultur Garden Bed”