Hi Everyone! This week I’m going to share some tips on photographing animals. I’ve always enjoyed photography, but have found a special interest in photographing animals. Here are a few of my favorite photos that I’ve captured over the years:


I remember as I was growing up I would have photo shoots with my bunny and our Labrador retriever. During high school I was able to travel to places like Australia and the Galapagos Islands where I spent most of my time there snapping photos of all the beautiful and unique animals.
For my high school graduation, my parents gave me a DSLR camera, the Canon 60D, which I still use today. This has allowed me to capture some really incredible moments. While I was in college I spent a summer working in Yellowstone National Park, which is where I met my husband, Chris. During this trip, I spent a number of early mornings going on photo outings, trying to come across and photograph all the incredible creatures in the park. I was really lucky during these outings and was able to get shots of bear cubs, badgers, mountain goats, elk, bison, and more. This experience further fueled my passion for animal photography.


While these days I am not photographing exotic animals, I do spend a great deal of time capturing photos of our horses and other farm animals, our home, and our property. Over the years I’ve learned a few animal photography tips through trial and error, and from my incredibly talented sister who happens to be a wedding photographer. I want to preface this with stating I am not a professional photographer, simply doing it as a hobby. With that being said, these tips come from an animal lover, creative soul, and hobby photographer, and I hope you find them helpful the next time you take photos of your dog, cat, horse, goat, or any other animal that you share life with!
10 HELPFUL TIPS FOR PHOTOGRAPHING ANIMALS
1. First and foremost, make sure the animal is in focus! How to do this: If you are using a phone or camera on “auto,” often this will be automatic. If the phone isn’t focusing on what you want, tap the desired area of focus (for touch screen phones) and it should refocus. On my camera I use a semi-automatic focus. When I’m taking a picture a red dot shows up in the viewfinder, and I simply point the red dot where I want the camera to focus. This ensures I have control over the focus of the image. If you have a camera where you can turn off auto focus, I recommend playing with the settings and seeing how you like it when you have more control over the focus. When selecting the best area to focus on, choose the eyes of the animal; that way the face is the “sharpest” area of the image.
Below is an example of what it looks like when the object is out of focus. Notice how the horse is slightly blurred, while the trees in the background are crisp?

And a couple of examples when the object is nice and sharp (aka “in focus”):


2. Plan ahead and choose the right time of day to ensure good lighting. Photography works best when you have adequate NATURAL lighting. Often times there’s a delicate balance between too much and not enough. My favorite time of the day to shoot is in the morning and late in the afternoon, when the sun isn’t directly above. Surprisingly, a cloudy day can also lead to some great photos, because the light is more diffused, or “softer.” Now, sometimes you can’t control what time you shoot, and thus can’t control the lighting for your photos. In these instances photo editing can be really useful! You can use editing to change the “exposure,” or brightness of the photo. You can also change the color temperature (ex. from cold tones to warm tones), and even bring out shadows and highlights. The photos below were taken during early morning or late afternoon:


3. Avoid using a flash whenever possible. While many cameras have built-in flashes, there are some major drawbacks to using a flash, including the appearance of harsh lighting. It can make the colors unnatural, change the color temperature, and increase the grain (or noise) of the photo. Another problem you may have encountered is the “red-eye effect,” which is another annoying feature when using a flash. To avoid using a flash consider tip #2, and make sure you have adequate lighting.
4. Go outside! There are a number of reasons to do this. 1) Consider tip #2 above, it will ensure natural lighting. 2) It provides an excellent background for your photos. 3) It provides a natural color temperature, which can be hard to adjust later. Of course if you are photographing an indoor cat this strategy will not work. In that case try positioning the animal in front of a window and take pictures of him/her in the light coming through the window.


5. Have an extra person on hand to help you. If you can find someone to entertain and handle the animal, you will be better equipped to get good photos! One of my horses walks towards me whenever he sees me come near, so if I want to take pictures of him, I always have my husband distract him so he isn’t in my face or lens. One of the only reasons I have been able to capture some adorable photos of our baby goat is because my husband can hold her so she stays still. Having an extra hand can be so helpful in so many situations! It will also allow you to get pictures of you with your animals as well, which is definitely a plus. My husband is often in our animal pictures because he’s that “extra person” when I’m taking photos. He’s the one holding the animals in all three photos below:


6. Take a LOT of pictures! On iPhones you can do a “burst” to ensure you captured the moment. On DSLR cameras you can also take a number of photos all in a row. When I take pictures of my animals, especially if they are action shots, I typically end up taking around 5-10 fair or poor photos in order to get at least 1 excellent photo. So, always take more than you think you will need! You can delete the bad ones later. For this reason, make sure you have enough memory space. If you’re planning on taking photos, delete old ones on your phone, and bring extra memory cards (or big ones) for your camera. I always have a 32GB memory card in my camera and I delete all the photos after uploading to my computer, so space is never an issue.
7. Try a number of different angles and distances. One of my favorite angles when taking pictures of animals is from the ground, or at least from below. It can feel pretty silly, but the pictures often turn out really cool! Play around with angles, taking photos from above, below, to the right, left, center. After you’re done you might be surprised which angles you like best. Also play around with your distance. For DSLR cameras you might have access to a wide angle lens or a nice zoom lens, which may mean you don’t actually have to move at all, but can adjust your lens and zoom. Whatever camera and/or lens you’re using, take plenty of close-ups, wide angle shots, and everything in between! In the photos below you can see both an example of a wide angle shot, and examples of close-ups:


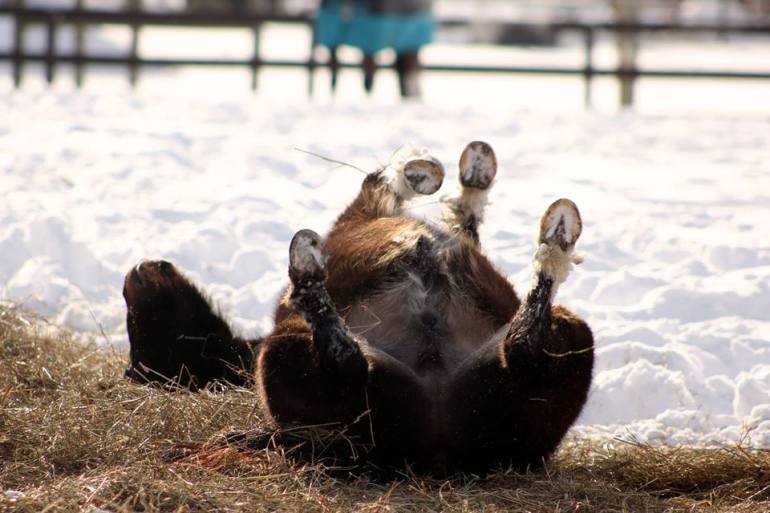
8. Encourage the animal(s) to be active. I’ve had a number of people ask me how I got pictures of my horses rearing, bucking, charging, etc. It is actually fairly simple! I know my horses play A LOT whenever I open up a new pasture. So when I want to get good action shots, I open up a pasture and wait… Within a few minutes they are running back and forth, playing like crazy, and gifting me with plenty of really amazing opportunities for incredible photos. I also know when I take my golden retriever outside to play and tell her “free!”, she will run around like a nut case all over the place, again giving me some great moments to capture on my camera. One thing to consider when taking action shots is the shutter speed. You will need an incredibly high shutter speed to capture animals in movement, especially at high speeds (like a horse running). In order to ensure a really crisp image of an animal in movement, aim for 1/1000+ sec shutter speed.


9. Always have your camera ready. Sometimes you just can’t create that ideal moment during a photo shoot. I always have my camera downstairs in the living room so that if I see the animals in an adorable pose I can quickly grab my camera and get the shot. For example, our Paint Horse, TJ, rarely ever lays down, and this is something I really want to capture on camera. So the next time I see him laying down, I’m going to quickly grab my camera and hopefully capture the moment!
10. Last tip: practice, practice, practice! I’ve been spending years taking photos of animals and still, often I find myself frustrated for not capturing an incredible moment as well as I’d like to. People spend their lives working on this, so it can take a lot of time and hard work to learn and do well. Over time you will notice your photos are improving with lots of practice. Don’t get discouraged, and keep on taking photos! It is so worth it at the end of the day when you have that beautiful moment in the form of a photograph to keep forever, and share with the world!
Thank you all for taking the time to read this post! I would love to read your thoughts, experiences, and tips of your own in the comments section.
All my best,
Jenn
